

Voice record module for plush toy with SD card
| Min. Order: | 300 Piece/Pieces |
|---|---|
| Trade Term: | FOB |
| Payment Terms: | Paypal, T/T, WU, Money Gram |
| Place of Origin: | Guangdong |
Company Profile
| Location: | Dongguan, Guangdong, China (Mainland) |
|---|---|
| Business Type: | Manufacturer |
Product Description
1. Introduce
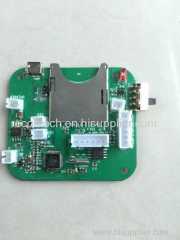
SL-RE02 is the new design of record module, it is new product, and connection is very simple. It is very long time for recording according to SD card capacity, support MAX 32G SD card
2. Application
Power speaker
Digital product
Toy
Portable product
Wireless product
Study using
Working Voltage: 3.7V
Output Power: MAX3W
Output impedance: 4~8Ω
Working current: 35MA
Recording current:40MA
SD capacity: MAX 32G
Recording time: according to SD card capacity
sampling rate: 24KHZ, bit rate: 192KBPS
Built in 3.7V battery
Have one or two LED lights to come on while the unit is recording
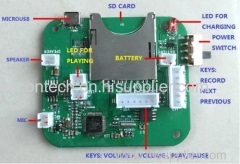
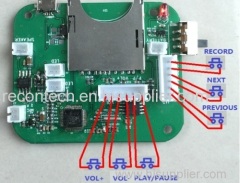
Six buttons: Recording, Play/Pause, VOL+, VOL-,Next, Previous
Built in microphone
Built in 3W mono speaker
Button wire:65CM
3. Feature
4.Operation
A. PLAYING MUSIC
1. Pick up the board, you can see all ports of the board.
2. Insert SD card(having some MP3 files).
3. Put the power switch to upward, the power is ON.
4. The two LEDs are light ON(RED color).
5. Press the "play/pause" button once, the two LEDs flash light, you can start to listen the music.6. Press the "play/pause" button once again, the two LEDs light on, the music stop to play music7. Press the "VOL-" button once, the volume will be decrease. If you hold on this button, the volume will be decrease continuously.
8. Press the "VOL+" button once, the volume will be increase. If you hold on this button, the volume will be increase continuously.
9. Press the "PREV" button once, the music will be skip to previous file.
10. Press the "NEXT" button once, the music will be skip to next file.
11. Put the power switch to downward, the power is OFF.
B. RECORDING
1. When the music is playing, press "play/pause" button once, the music will be stop, the LED light on.
2. Press "record" button once, you can start to record.
3. Press "record" button once again, recording will be stop. Every recording will be auto- generate different file.
4. The SD disk will be auto- generate the recording folder. All of recording files will be auto saving into this folder.
C. CHARGING
1. You can prepare 5V power adapter, USB data cable(one side is A type USB port, another side is Micro USB port), this cable is the same as the charging cable of mobile.
2. Plug the cable to the Micro USB port of the board, another side of the cable connect to the 5V power adapter or computer
3. The LED of the charging is light on(red color)
4. If the battery reach to full capacity(about 4.2V), the red LED light off. So you can take off the cable.

