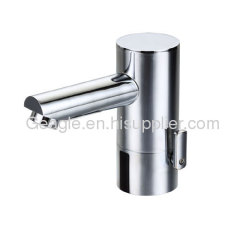
Integrated Automatic Faucet 8804
30.0~50.0 USD
| Min. Order: | 200 Piece/Pieces |
|---|---|
| Trade Term: | FOB |
| Payment Terms: | L/C, T/T |
| Supply Ability: | 10,000Pcs/Monthly |
| Place of Origin: | Zhejiang |
Company Profile
| Location: | Ningbo, Zhejiang, China (Mainland) |
|---|---|
| Business Type: | Manufacturer, Trading Company |
| Main Products: | Automatic Sensor Faucet, Automatic Hand Dryer, Automatic Soap Dispenser |
Product Detail
| Means of Transport: | Ocean, Air, Land |
|---|---|
| Function: | Induction |
| Usage: | Wash basin |
| Brand Name: | I'Clivia |
| Material: | chrome * brass |
| Installing Mode: | ZY-8804D |
| Water Pressure: | 0.05-0.7MPa |
| Working Temperature: | 0.1-60 |
| Minimum Order:: | 200PCS |
| Quality System Certification:: | CE |
| Production Capacity: | 10,000Pcs/Monthly |
| Packing: | 8pcs/Ctn |
| Delivery Date: | 7-30days or negotiable |
Product Description
Integrated Automatic Faucet Features:
1.Control:Designed with SCM. Stop water automatically when water flowing exceed 1 minute.
2.Adjustable distance: Induce distance can be adjusted free of touching.
3.Strainer device: Strainer can be removed and clean to prevent blocking.
4.Check valve :Check valve inside the faucet body.
5.Structure: All parts are included inside the faucet. With warm cold adjusted handle.
6.The length of faucet can be customized
Technical Data:
| Detailed Product Specification | |||
| Model | DC | AC | AD |
| Power Supply | DC:6V | AC:110V.220V-240V. 220V-50Hz | AC:220V-50Hz/DC:6V |
| Applicable Water Pressure | 0.05-0.7MPa | ||
| Water Temperature | 0.1-60ºC | ||
| Environment Temperature | 0.1-45ºC | ||
| Water supplying caliber | G1/2 G3/8 | ||
Overall dimensiions:
Installation diagram:
Instructions for use:
1. Sensor/flow test.
When the unit is powered on, water should flow immediately when you put your hands within range of the sensor. When you remove your hands out range the water should stop immediately.
The maximum duration of continuous flow is 1 minute.
2. Sensor range
The default factory set distance is 12~15 cm. When powered on for the first time, place your hands at the desired distance within 5 seconds after the power has been switched on and remove your hands after approx 2 seconds in order to change the factory setting.
To reset the setting, interrupt power for at least 30 seconds and follow the procedure as described to set the sensor range correctly.
3. Strainer
To prevent blockage please clean the strainer regularly, make sure you shut of the water mains, unscrew the water inlet hose, remove the strainer, clean with water and a soft brush. Then install the items in reverse order, turn on water mains and check for leakage.
Battery Change:
The indicator light in the sensor will flicker 3 times per second to indicate the batteries are at the end of their useful life. At this stage the unit will not operate in battery more anymore
In case you have plugged in the mains, disconnect power and open the cover of the control box, open the battery holder, remove the batteries and replace all batteries with new ones.
Please make sure you install the batteries in the right direction, the + and – side are indicated in the battery holder.
Close the battery holder, place the cover back in place and tighten the screws.
Follow the instructions for setting the sensor range if required.
Problem:
The unit does not work. Please check for power connection or replace the batteries, check connection of the sensor cable.
There is power however no water flow,
Please check the water supply, open any closed valves if necessary
Check water connections for blockage, clean if necessary
Check Strainer for Blockage, clean if necessary
Disconnect power for 30 seconds and re install
Check water connections for twists
Check sensor cable connection
Clean the sensor with a soft cloth
Caution:
Please handle the product with care whilst installing
Only clean with soft cloth, no abrasive cleaning agent, acidulous cleaning agents.
Do not spray the control with water.
Only clean the sensor with a soft cloth, scratching will reduce the range and sensitivity of the unit itself

