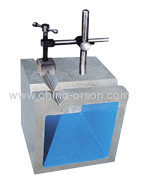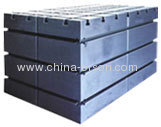
Inspecting tools Cast iron Square Box
| Min. Order: | 10 Piece/Pieces |
|---|---|
| Payment Terms: | L/C, D/A, T/T |
| Supply Ability: | 1,000 Piece/Pieces per Month |
| Place of Origin: | Shandong |
Company Profile
| Location: | Qingdao, Shandong, China (Mainland) |
|---|---|
| Business Type: | Manufacturer, Trading Company |
| Main Products: | Green Product RGB Ceiling Light, Green Product Downlight, E27 RGB Green Product, DMX RGB Prompt Delivery, COB Small Orders Accepted Prompt Delivery |
Product Detail
| Model No.: | Cast iron Square Box-2 |
|---|---|
| Means of Transport: | Ocean |
| Used: | Parallel degree |
| Size: | 100, 150, 200, 250, 300, 350, 400, 500, 600. |
| Material: | Cast iron |
| Shape: | square box |
| Production Capacity: | 1,000 Piece/Pieces per Month |
| Packing: | According to customer's requirement |
| Delivery Date: | 20 days after prepayment done |
Product Description
Cast iron square box material using HT300 grey iron casting, can root the user's requirements or drawing processing customized various types, square box surface can open T, V, rice type tank, etc.
Cast iron square box structure, is a cavity cube with 6 working surface wich are made of cast iron or steel, one of the working face has a v-slot. (Also can be produced to T-slot. According to the user's required to process order). Square box test of the environmental conditions: normal temperature and humidity. The working surface of cast iron square box may not have rust, scratches, cracks, dents and other defects affecting measurement performance. Non-working surface should be processed with clean sand painting and edge chamfering.
D. Additional remark
Cast iron square box structure, is a cavity cube with 6 working surface wich are made of cast iron or steel, one of the working face has a v-slot. (Also can be produced to T-slot. According to the user's required to process order). Square box test of the environmental conditions: normal temperature and humidity. The working surface of cast iron square box may not have rust, scratches, cracks, dents and other defects affecting measurement performance. Non-working surface should be processed with clean sand painting and edge chamfering.
B. Using of square box
Square box function: Cast iron square box is mainly used for the testing and marking of the parallel and vertical degree of each part. Square box is a kind of cavity cube with 6 working surface wich are made of cast iron or steel, one of the working face has a v-slot.


C . Method of square box
Square box test method: For the square box, which side length of 315mm and below this size, put 1mm gage block at each side of the tested surface of square box, and put knife block lip ruler on the working surface, then test the plug with gage block at each tested point. The difference between the size of gage block group which is just pluged and both side of the gage block is regarded as deviation of the tested point and the both siedes This test should be processed at several sections of the square boxes working surface in vertical, horizontal and diagonal direction. When the various locations of the measured error which in the same direction are same that means it is maximum value, when the error direction is inconsistent, take the absolute value of the max. positive and negative difference as the flatness of inspected surface.


D. Additional remark
Some graphics and description in the instruction menual are just as a instruction, please according to real product.
This instruction manual dosen't effect the product performance, safety and customer usage. If there is a difference between our product, for the promotion of our products , please according to the real product, no other explanation.
Type (mm) | Parallelism of working surface | Flatness of working surface | Perpendicularity of working surface | |||
Precision grade (μm) | ||||||
1 | 2 | 1 | 2 | 1 | 2 | |
100 × 100 × 100 | 2 | 4 | 2 | 4 | 2 | 4 |
150 × 150 × 150 | 3 | 6 | 3 | 6 | 3 | 6 |
200 × 200 × 200 | 4 | 8 | 2.5 | 4 | 4 | 8 |
300 × 300 × 300 | 6 | 12 | 2.5 | 4 | 6 | 12 |
400 × 400 × 400 | 8 | 16 | 4 | 8 | 8 | 16 |
500 × 500 × 500 | 20 | 40 | 5 | 12 | 20 | |


