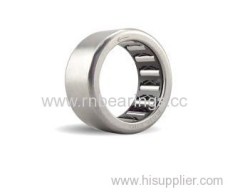
Drawn Cup Roller ClutchesHF1216
Demension: 12×18×16mm, Weight: 11.6g.
SHAPE LOCATION TOLERANCE SHOULD BE TO CURRENT STANDARD;
Outer ring fordrawncup needle roller bearings(DC type) is made of cold rolled steel strip accurately formed.Structure of DC needle roller bearings features space saving and higher capacity.They are suitable for applications with limited space and housing not hard enough to act as raceway. No requirement on axial location when the DC needle roller bearing is pressed into the housing.
In most applications inner ring is not necessary for DC needle roller bearings unless shaft raceway is impractical,standard inner rings for DC to compare with open end DC needle roller bearings, close end DC needle roller bearings are good for sealing at the close end of bearings,operating temperature range for bearings grease lubricatedare 20℃ to +120℃.
Drawn Cup Roller Clutches HF1216
1. Structures of various series of drawn cupneedlerollers
Metricseries: HK, BK, F, FH, FY, MF, MFH,MFY
Inch series: SCE, BCE, SCH, BCH,SN, B, BH, M, MH
HK: Caged, with open ends
BK: Caged, with open ends
F : Full complement, with open ends
FH : Full complement,withopenends(Heavy series)
FY : Full complement, grease retained,withopenends
MF : Full complement, with closed ends
MFH:Fullcomplement, with closed ends(heavy series)
MFY: Fullcomplement,withclosed ends
SCE: Caged, with open ends
BCE:Caged, withclosedends
SCH: Caged, with open ends(heavy series)
BCH: Caged,withclosed ends(heavy series)
SN : Full complement, greaseretained,withopen ends
B : Full complement, with open ends
BH :Fullcomplement, with open ends(heavy series)
M : Fullcomplement,withclosed ends
M H: Full complement, with closedends(heavyseries)
2. Inspection the enveloping circle diameter
The dimensional accuracy of drawn cup needle roller bearings cannot be measured before fitting
without a ring gauge as the thin-walled outer ring can be out of round due to the manufacturing process.
The bearings obtain the accuracy required for their correct function only when pressed into ahousing
bore which must be manufactured with the recommended tolerance limits.
The enveloping circle diameter can then be checked as follows:
a. Press the bearing into a steel ring gauge(wall thickness≥20mm).The bore dimension of the ring
gauge must correspond to that given.
b. Measure the enveloping circle diameter with cylindrical go and no-go gauge plugs.
| ShaftDia. | Part Number | Dimension | Torque Rating | LimitingSpeed | Weight |
| Fw | D | C | Shaft | Housing |
| mm | mm | Nm | RPM | g |
| 3 | HF0306 KF | 3 | 6.5 | 6 | 0.18 | 45000 | 8000 | 1 |
| 4 | HF0406 KF | 4 | 8 | 6 | 0.34 | 34000 | 8000 | 1 |
| 6 | HF0612 KF | 6 | 10 | 12 | 1.76 | 23000 | 13000 | 3 |
| 8 | HF0812 KF | 8 | 12 | 12 | 3.15 | 17000 | 12000 | 3.5 |
| 10 | HF1012 KF | 10 | 14 | 12 | 5.3 | 14000 | 11000 | 4 |
| 3 | HF0306 KF R | 3 | 6.5 | 6 | 0.06 | 45000 | 8000 | 1 |
| 4 | HF0406 KF R | 4 | 8 | 6 | 0.1 | 34000 | 8000 | 1 |
| 6 | HF 0612 KF R | 6 | 10 | 12 | 0.6 | 23000 | 13000 | 3 |
| 8 | HF0812 KF R | 8 | 12 | 12 | 1 | 17000 | 12000 | 3.5 |
| 6 | HF0612 R | 6 | 10 | 12 | 0.6 | 23000 | 13000 | 3 |
| 8 | HF0812 R | 8 | 12 | 12 | 1 | 17000 | 12000 | 3.5 |
Drawn Cup Roller Clutches HF1216


