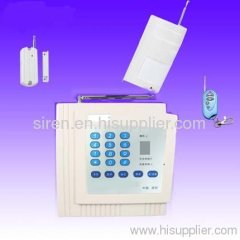
BURGLAR SECURITY ALARM SYSTE
ITEM NO:SC-2003C
Part1 Key functions
1. Zone display: LED digital display, indicates zone of intrusion
2. 12 seconds voice record function
3. 6 zones capability: pre-stored alarm event such as fire-alarm, intrusion, gas leakage.
4. 6 groups lines alarm automatically: the main unit will advise alarm status and also display the alarm zone
5. Power off protection: all inputted data including pin codes will not be affected in a power failure
6. Separate arm and delay arm function
7. Recognise alarm events: can inform through telephone the cause of alarm i.e. intrusion, fire, gas or smoke by number of beeps.
8. Remote access function, remote arm,disarm, start up siren etc
9. Easy to add on additional detectors if required
Anti-tamper function: the alarm will activate if the telephone wire is cut off
Code protection: all actions cannot be processed without the correct code; you can change the code any time.
Dial to extension number, or extension number dialing out for alarming
Standby batteries
Network function, the first telephone must be the monitor center
Part2 Main unit installation
1. Note: the main unit should be easily accessible, there should be a power socket available and also a telephone line
2. Connect the telephone line cord: Connect all the lines as in figure below (connect telephone line first and then connect power), then install batteries into the compartment
3. Install detectors: place all detectors as desired whilst making sure that there is no interference of signal from other electrical equipments
4. The main unit and wireless detectors should not be near to metal objects, or it will shorten the launch and receive distance
5. After main unit installation, please test the system. Under disarm status, the telephone can be used normally
Main unit installation figure:
Part3 Door gap detector installation
Clean the place where you wish to install the detector. Take out the door gap detector and peel off the double side tape cover.
Door/window gap detector should be mounted on the door/window, and magnet should be mounted on the frame of the door or window
Be sure that the antenna is pulled out
The gap between the detector and magnet should not be wider than 1.5cm when the door is closed.
After installation, the LED will flash for 1second when you open the door/window, which shows installation is successfully
Warning: neither the detector nor the magnet should be fixed directly to a metal surface.
Part4 PIR Detector Installation
(passive infrared)
Switch on the PIR to check for flashing red light (please do not make any fingerprint marks on the surface of SENSOR component). Installation height should be 2.0-2.2 meters from floor (best 2.0meters).
By using the provided bracket, mount the bracket to the screw hole in the back cover, and strengthen it by screw, take out the bracket and mount it on the wall by two screws. Press the installed PIR detector to the round hole in the centre of the base bracket, and adjust the detector to the best angle.
Note:
1. PIR detector should not face the window
2. In the same detection area, two PIR detector are not permitted in case there is interference
3. Please avoid to it facing, air conditioners, fire stove etc in case false alarm
4. At the start of the PIR detector, needs 2 minutes to sense the surroundings, so please use remote controller to arm after 2 minutes
5. PIR detector can only be mounted indoors and not outdoor
Part5 Curtain PIR Detector Installation
The installation method is same as above PIR detector
Part6 Smoke Detector Installation
Before installation choose the best place for installation and clean the area. Take out the bracket and fix it onto the ceiling, and make the button at the bottom of the detector to aim at the outstanding button in the bracket, then turn the detector anticlockwise, and make the detector fasten onto the bracket.
Please pay attention to the following during installation
1. Do not mount the detector to the place with strong cross-ventilation
2. Distance between smoke detector to wall corner must be at least 0.75meter
3. Area must be dustproof and waterproof