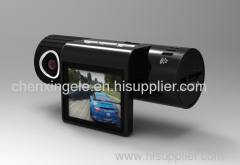
F191 infrared Car camera
| Min. Order: | 1 Piece/Pieces |
|---|---|
| Payment Terms: | L/C, T/T, WU |
| Supply Ability: | 500000 |
Company Profile
| Location: | China (Mainland) |
|---|---|
| Business Type: | Manufacturer |
Product Detail
| Means of Transport: | Air |
|---|---|
| Brand Name: | CX |
| Pixel of lens: | 5 mega CMOS |
| Visual angle of lens: | Wide angle 130 |
| Video resolution: | VGA-720X480 HD-1280X720 |
| Production Capacity: | 500000 |
| Packing: | color box |
| Delivery Date: | 7 days |
Product Description
Foreword
Thank you for your purchase of our product, this product adopts unique ultra-portable design such that it can be applied in various fields to provide convenient, safe and colorful daily life for you. Before use of the product, please read this user manual carefully and save it; we hope this product can meet your demands and serve you in long term.
Standard accessories:
Charger |
USB extension line |
CD disk |
User's manual |
Announcements
1-Suitable use situation: Please follow State's laws and decrees. Do not use it illegally.
3- Suitable use environment: Do not put the product under humid and high temperature environments for using as it has no water proof and high temperature resistant functions.
4-Cleaning requirement: Do not use it under environment with too large dust density to prevent lens and other components from being tainted with dust to influence pick-up effect. Lens can be slightly cleaned by lens paper or glasses cloth to keep it clean.
5-Others: This product is a precision electronic product and do not make it subject to any impact or vibration; Do not use it in strong magnetic fields or electric fields.
6-512M or above memory card should be provided at the least, the longer the split time for recording, the higher the requirement on memory card. The machine can work normally only when it is installed with the memory card.
7-Programs should be burned to the machine in time when there is any program loss due to abnormal use, please refer to file in CD data.
Contents
I. Product Introduction
II. DV Structure Diagram
III. DV Structure Introduction
IV. Main Menu Introduction
V. Pick-up
VI. Photographing
VII. Playback Mode and File Management
VIII. On-vehicle Shooting and Charging Description
IX.USB Flash Disk Memory
X. PC CAM Mode
XI. Parameters Specifications
I. Product Introduction
This product is a novel multifunctional high-tech product integrating high-definition pick-up, photographing, night vision, recording, chatting online and flash card memory. It is mainly used for on-vehicle shooting so as to effectively improve obtaining of evidence of accidents. It is appropriate for daily life, traveling and outdoor actions; it provides you a colorful life.
II. DV Structure Diagram
III. DV Structure Introduction
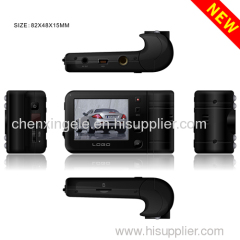
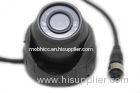
1-ON/OFF, MENU 2-PHOTOGRAPHING 3-PICK-UP 4-PLAY, OK 5- RESET 6-VGA-HD SWITCH 7-USB INTERFACE 8-TF CARD SLOT 9-WORKING INDICATOR 10-CHARGING INDICATOR 11-MIC MICROPHONE 12-DISPLAY SCREEN 13-LENS 14- Lens frame 15- Bracket slot 16-PHOTOSENSITIVE DEVICES 17-NIGHT VISION INFRARED LAMP 18-PICK-UP LENS 19-LOUDSPEAKER
IV. Main Menu Introduction
Turn on the machine by pressing ON/OFF, blue light will lights in long time; continuously short press ON/OFF twice under photographing, pick-up and playback modes to enter into main menu mode, as shown in the following picture.
Press PLAYBACK to select items in turn, press ON/OFF to exit from menu, long press ON/OFF to turn off the machine and save settings, and press key 5 (RESET) to cut off the power so as to turn off the machine in case of any halt happened due to abnormal operation or happened under abnormal environment.
V. Pick-up
Under pick-up mode, short press ON/OFF to enter into pick-up menu, as shown in the following picture:
Short press PLAYBACK to select items in turn, press ON/OFF to exit from menu; short press PICK-UP under photographing mode to switch into pick-up mode, short press PICK-UP to record video, short press PICK-UP to stop during pick-up and save video files; and long press PHOTOGRAPHING and PICK-UP to enter into focal length debugging that can be as high as 3.95x zoom. Video format switching method is as follows: dial key 6 to switch between VGA (720*480) and HD (1280*720).
VI. Photographing
Under photographing mode, short press ON/OFF to enter into photographing menu, as shown in the following picture:
Short press PLAYBACK to carry out menu selection in turn, and press ON/OFF to exit from menu after pressing OK; short press PHOTOGRAPHING under pick-up mode to switch into photographing mode, and short press PHOTOGRAPHING to take pictures; and long press PHOTOGRAPHING and PICK-UP to enter into focal length debugging that can be as high as 3.95x zoom.
VII. Playback Mode and File Management
Long press PLAYBACK three seconds to enter into playback mode, and short press ON/OFF under playback mode to enter into playback menu, as shown in the following picture:
Short press PLAYBACK to carry out menu selection in turn, and press ON/OFF to exit from menu after pressing OK; short press PHOTOGRAPHING (previous track) and PICK-UP (next track) under playback mode to select file; select PICTURE REVIEW, short press PLAYBACK to enlarge pictures as high as 8x, press ON/OFF after enlarging pictures such that you can see on the display screen, press FUNCTION to move pictures, and press ON/OFF again to exit; when selecting to play video, press PLAYBACK to play or suspend; press ON/OFF to carry out fast forward, there are 1X, 2X, 4X and 8X several modes in turn; and long press PLAYBACK three seconds to exit from playback mode.
VIII. Charging Pick-up and Charging Description
When it is inserted in a power supply charger, the machine turns on automatically, working indicator (blue) and charging indicator (red) light, then pick-up function starts automatically, and normal operation can be carried out by pressing FUNCTION after starting pick-up; no pressing operation should be carried out after the machine is connected with the charger if it is necessary to keep the charging pick-up state; the machine will keep picking up 15s and turn off automatically after the car is shut off or the charger is pulled out, the machine will be in pick-up state without any operation if the charger is connected again or the car is started within the delay switch-off period.
If it is necessary to charge, you can press ON/OFF to turn off the machine after the charger is inserted in and the machine is turned on so as to keep best charging state, red light goes out after battery is filled, about 1h of pre-charging time should be kept.
IX. USB Flash Disk Memory
Removable disk |
Removable storage device available |
X. PC CAM Mode
When using PC CAM function, it is necessary to install the driver on the PC in advance, please refer to in the CD data for the operation method, dial key 6 that is at the bottom of the machine to HD after successful installation according to description, under any mode, connect the machine with PC USB cable such that the machine enters into PC CAM mode, open on the PC desktop after successful connection, find , double-clicking open it, then you can use the machine as PC CAM in case of normal viewing.
XI. Detail Paramet
Pixel of lens | 500W CMOS |
Visual angle of lens | Wide angle 130° |
Steering angle of lens | 220° |
Video resolution | VGA-720X480\HD-1280X720 |
Video format | AVI |
Video frame number | 30fps |
Picture format | JPEG |
Picture pixel | Max 4032*3024 |
Night vision function | support |
Web camera | support |
USB flash disk function | support |
Motion dect | support |
Sound recording | Synchronous sound and video recording |
Capacity of memory card | 512M-32GB |
Type of memory card | TF card |
Power consumption | 250-300MA |
Range of sound recording | 40 |
Storage temperature | -20-60 DEG C |
Operating temperature | -20-60 DEG C |
Operating humidity | 15-65%RH |
Play software | Media player/KM player |
USB interface | USB2.0 |
Display screen | 2.0TFT high definition display screen |
Capacity of battery | 1800MA at the most |
Charging current | 400MA |
Charging time | About 5h |