Sine Bar
50.0~500.0 USD
| Min. Order: | 1 Piece/Pieces |
|---|---|
| Trade Term: | FOB |
| Payment Terms: | L/C, T/T, WU |
| Place of Origin: | Hebei |
Company Profile
| Location: | China (Mainland) |
|---|---|
| Business Type: | Manufacturer |
Product Detail
| Means of Transport: | Ocean |
|---|---|
| Delivery Date: | 1 to 3 months |
Product Description
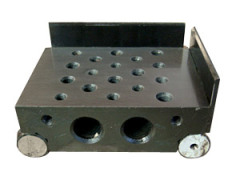
Sine Bar
1.Sine Bar
A sine bar, also called a sine gauge or a sine plate, is a measuring gauge which is used for the precision measurement of angle or conicity. The sine gauge mainly consists of a cuboid body with two cylinders at its ends. Both the cuboid body and the cylinders are made of steel, and the two cylinders have an equal diameter. When the sine gauge works, the top surface of the sine gauge is made tilted to a certain degree due to the angle to be measured under it. Then by using a set of gauge blocks, the top surface of the sine gauge will be made horizontal. By calculating the ratio of the height of the gauge blocks used and the distance between the centers of the two cylinders (The distance between the centers of the two cylinders is generally 100 mm or 200 mm.), the angle to be measured can be known according to the principle of sine function. A sine gauge is generally used to measure an angle which is less than 45°. When it is used to measure an angle less than 30 °, the measuring accuracy can reach 3″~5″.
2. The Technical Requirements of the Sine Gauge
1) There should be no defects such as cracks, scratches or slag inclusions on the working surface of the sine gauge. Such defects may affect the appearance and working performance of the product.
2) For the sine bar, the hardness of the working surface of the main body should not be less than 664 HV, the hardness of the working surface of the cylinders should not be less than 713 HV, and the hardness of the working surface of the baffle should not be less than 478 HV.
3) For the sine bar, the maximum permissible value of the roughness of the working surface of the main body is 0.08μm, the maximum permissible value of the roughness of the working surface of the cylinders is 0.04μm, and the maximum permissible value of the roughness of the working surface of the baffle is 1.25μm.
4) All the parts of the sine gauge should be demagnetized, and the stability treatment must be performed on the main body and the cylinders.
5) The sine gauge should be able to be set to any angle between 0°and 80°. The structure rigidity of the sine gauge and the strength of each part of the sine gauge should be adapted to the working conditions of grinding, and all the parts should be easy to dismantle and repair.
6) The cylinders of the sine gauge should be fixed stably on the main body by using screws. There should be no deformation caused to the cylinders and the main body, and after fastening, there should be no screwhead appearing on or protruding out of the surface of the cylinders.
3. The Specification of the Sine Gauge (mm)
100×25
200×40
100×80
200×80
300×150


.jpg)