
All in one 6 functions Universal Welding Gauge with 60mm Width
| Min. Order: | 1 Piece/Pieces |
|---|---|
| Payment Terms: | T/T, paypal, WU |
| Supply Ability: | 87555 |
| Place of Origin: | Guangdong |
Company Profile
| Location: | China (Mainland) |
|---|---|
| Business Type: | Manufacturer, Trading Company |
Product Detail
| Model No.: | WG-407 |
|---|---|
| Means of Transport: | Ocean, Air, Land |
| Brand Name: | ROKTOOLS |
| Material: | stainless steel |
| package: | Plastic box |
| weight: | 0.2kg |
| Instruction: | YES |
| Locking screw: | YEs |
| Highly Polish: | YES |
| surface heigh: | 0-15mm |
| Width: | 0-60mm |
| Production Capacity: | 87555 |
| Packing: | plastic box |
| Delivery Date: | 10-20 |
Product Description
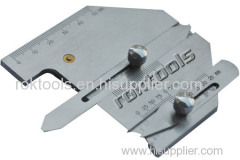
All in one 6 functions Universal Welding Gauge with 60mm Width
0-15mm
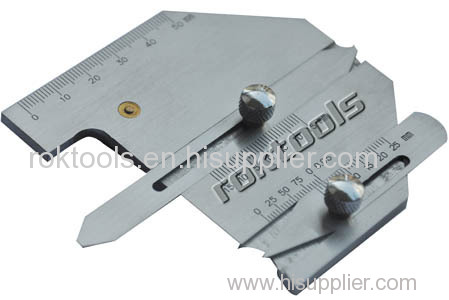

Part No: WG-407
Manufactured by Rok International Industry Co., Limited.
Welding Inspection instruments from China offer you accuracy result.
Surface Height: 0-15mm
Height of Fillet Weld: 0-15mm
Thickness of Fillet Weld: 0-15mm
Width: 0-60mm
Undercut Depth of Welding Seam: 0-5mm
Bevel Angle of Weldment: 80-160mm
Gap Size: 0.5-6mm
1.Measure the height of a flat weld: first align the undercut gauge and the depth gauge to zero and fix the screw; and then move the height gauge to touch the welding spot and see the indicating value of the height gauge for the height of the weld
2.Measure the height of a fillet weld: close up the working face of the ruler to the weldment and the welding spot. Move the height gauge to touch the other side of the weldment and see the indicating line of the height gauge for the height of the fillet weld.
3.Measure the fillet weld: the welding spot at 45 degrees is the thickness of the fillet weld. First close up the working face of the main body to the weldment; move the height gauge to touch the welding spot; and see the indicating value of the height gauge for the thickness of the fillet weld.
4.Measure width of the weld: close up the main measuring angle to one side of the weld firstly; then rotate the measure angle of the multi-purpose gauge to close up to the other side of the weld; and see the indicating value of the multi-purpose gauge for the width of the weld.
5. Measure the groove angle of the weldment: coordinate the main ruler with the multi-purpose gauge in accordance with the required groove angle of the weldment. See the angle formed by the working face of the main ruler and the multi-purpose gauge. See the indicating value of the multi-purpose gauge for the groove angle.
6.Measure the undercut depth of the weld: first align the height gauge to zero and fix the screw; and use the undercut gauge to measure the undercut depth and see the indicating value of the undercut gauge for the undercut depth.
Measure a fit-up gap: insert the multi-purpose gauge between two weldments; and see the indicating value of the gap gauge on the multi-purpose gauge for the gap value.
III Maintenance Method
1. Do not stack the welding inspection ruler together with other tools to avoid scratches caused by deformation, blurred lines and impaired accuracy.
2. Do not scrub the calibration with amyl acetate.
3. Do not use the gap gauge on the multi-purpose gauge as a tool
China top quality from Roktools, USed in Vessal, power station,
Made in China